Knit editor overview
The knit editor charts knitting patterns on a squared grid, the way knit charts are traditionally drawn. Each cell is one stitch: you pick a stitch type, paint it onto the grid, and grow or reshape the chart one row or column at a time. Rows and columns are numbered down the sides so you can read the chart as you knit.
This page introduces the editor’s layout and how to start a chart. The rest of this section covers placing stitches, shaping the chart, and exporting and sharing.
Creating a chart
Section titled “Creating a chart”- Sign in and go to Your workspace.
- Select New, then New knit. StitchPress creates a blank 10 × 10 chart named Untitled and opens it in the editor.
- Start painting stitches — see Placing stitches.
You can also open the app menu (☰) and choose Knit to see all of your charts under My diagrams, and create one there with New diagram.
To rename a chart, click its name at the top left of the editor, type the new name, and press Enter (or Esc to cancel).
The workspace
Section titled “The workspace”- Header tray (top) — the app menu, the chart name, and Save with the save status on the left; Export range and Share on the right. The chevron at the top left of the canvas hides or shows the tray (Hide header / Show header) to give the chart more room.
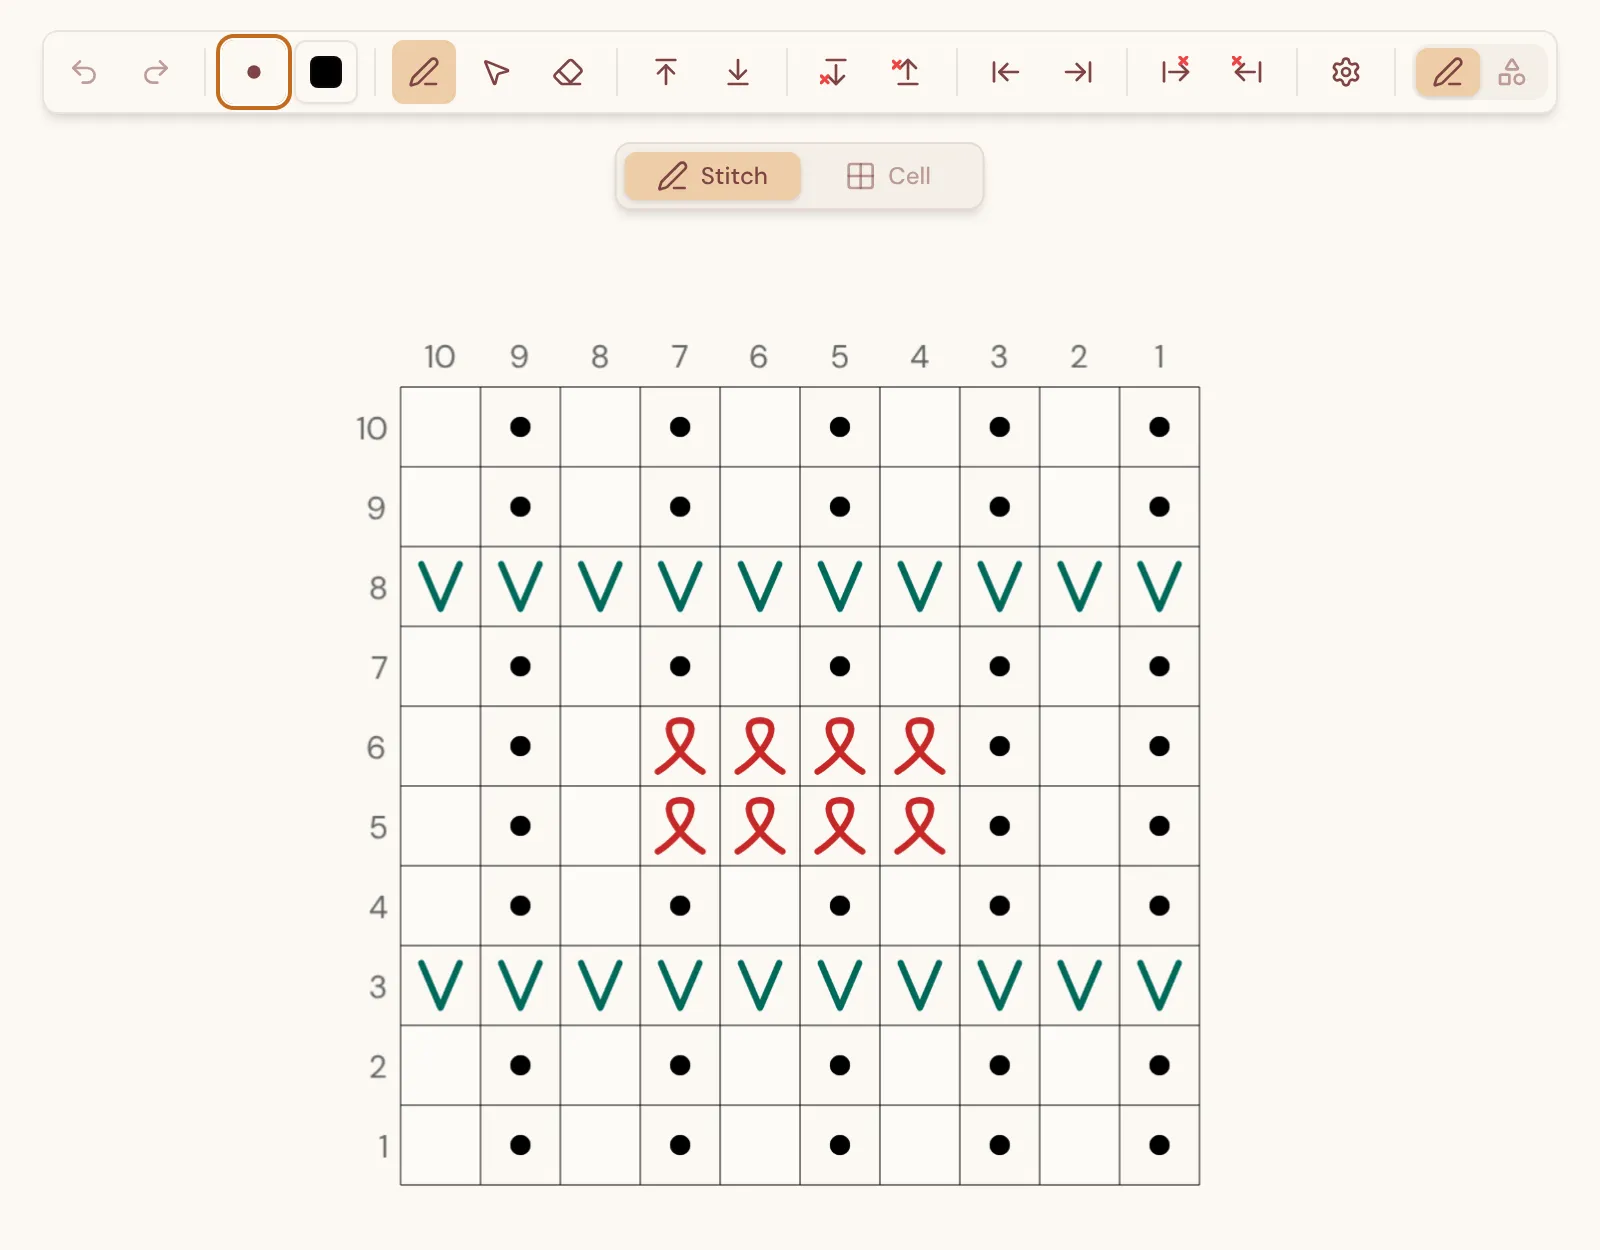
- Toolbar (top of the canvas) — from left to right: Undo and Redo; the stitch picker and stitch color; the Place, Select, and Erase tools; buttons to insert and remove rows and columns; the Settings gear; and the Stitch / Annotation layer switch.
- Stitch / Cell switch (below the toolbar) — chooses whether you are working into the chart’s cells or changing the shape of the chart itself. See Shaping the chart.
- Canvas (center) — the chart, with column numbers along the top and row numbers down the left side.
The knit editor has no side panels: everything you need sits in the toolbar and the right-click menu.
Reading the chart
Section titled “Reading the chart”Knit charts are read from the bottom up, the way the fabric is worked:
- Row 1 is the bottom row, and row numbers count upward.
- Column 1 is the rightmost column, and column numbers count to the left.
The numbers update automatically when you add or remove rows and columns. If your chart has an irregular outline, the numbering spans its full width and height, including any gaps.
Saving
Section titled “Saving”Your chart saves automatically as you work, and the status next to Save tells you where things stand — for example Saved, Synced, or Offline — saved on this device. Select Save or press Cmd/Ctrl + S to save right away. If you open the same chart in another tab or on another device, changes show up in both.
The settings menu
Section titled “The settings menu”The Settings gear in the toolbar holds options for this editor:
- Input mode — Keyboard + Mouse or Trackpad, which changes how scrolling pans and zooms (see Canvas basics).
- Custom cursor — while you paint, the pointer shows the selected stitch in its color (on by default). Turn it off to use your system’s pointer.
- Font size — the size of the interface text.
- Canvas grid — Off, Dots, or Lines behind the chart.
- Canvas background — the color behind the chart: Paper (the default), White, Linen, Stone, Charcoal, Night, or a Custom color.
- Stitches used — a legend of every stitch type in the chart.
- Generate text — written row-by-row instructions for the chart. See Exporting and sharing.
- Info — the app version.
Keyboard shortcuts
Section titled “Keyboard shortcuts”| Action | Shortcut |
|---|---|
| Save | Cmd/Ctrl + S |
| Undo / Redo | Cmd/Ctrl + Z / Cmd/Ctrl + Shift + Z (or Cmd/Ctrl + Y) |
| Copy / Paste the selected cells | Cmd/Ctrl + C / Cmd/Ctrl + V |
| Switch between Stitch and Cell modes | A |
| Open the stitch pie menu at the pointer | Hold S |
| Switch to the stitch / annotation layer | 1 / 2 |
| Open the command palette | Cmd/Ctrl + K |
| Pan the canvas | Space + drag, or scroll |
| Zoom | Ctrl + scroll |
| Cancel the current action | Esc |
The complete list for every editor is in Settings → Hotkeys. On a touch screen, use one finger to paint and two fingers to pan and zoom; a long-press opens the right-click menu.