Sizing and shaping stitches
Sizing controls let you adjust the parts of individual stitches — the length of a cap or crossbar, the width of a single crochet, the angle of a bar — to shape your diagram exactly the way you want it. This is what turns a grid of identical symbols into a chart that follows the real shape of your piece.
Sizing mode
Section titled “Sizing mode”Select Sizing in the toolbar to enter sizing mode. Every stitch on the canvas grows a set of small round orange knob handles that you drag to resize its parts.
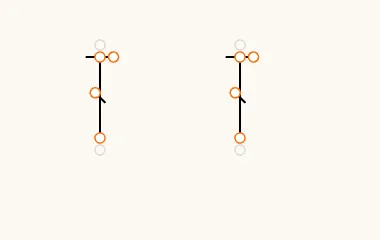
The knobs a stitch shows depend on its type:
- Top cap and crossbars — on double crochet and taller stitches, knobs on the top cap and on each crossbar set how long they are.
- Hook — on post stitches, a knob sets the size of the post hook.
- Width — on single crochet and its variants, and on the legs of increases and decreases, a knob sets the width.
- Clusters and popcorns — knobs set the width and cap length.
- Gaps — knobs at the top and bottom of the stitch body set the small gap between the symbol and its base or top.
Drag a knob to resize; the change applies to that stitch alone, so you can shape stitches individually across a round. To change the overall length of a stitch, switch back to Edit mode and move its handles, or use Lengthen and Shorten (] and [).
Rectangular stitches — chains, slip stitches, and single crochet drawn as a box — have no knobs. Select one in Edit mode to resize it with its corner and edge handles, or set its size in the Inspector under Rect size.
To reset a body gap, right-click the stitch in Edit mode and choose Reset gap.
Advanced: angle and position
Section titled “Advanced: angle and position”While you are in Sizing mode, a second button — Advanced — appears next to it. Turn it on to fine-tune the angles and position of a stitch’s bars rather than their length.
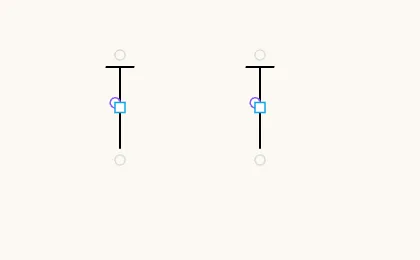
In the advanced view, the handles change shape to show what they do:
- Round handles set an angle — the cap angle at the top of the stitch (including the shared top of a decrease, and the cap of a cluster or popcorn) and the crossbar angle of the diagonal bar.
- Square handles set a position — where the crossbar sits along the leg.
A few things to know:
- Adjustments are offsets from the stitch’s normal shape, so a stitch you never touch keeps its standard look.
- For a taller stitch with several bars (a treble or double treble), click the stitch to expand it to per-bar handles, so you can angle each bar on its own. Click an empty part of the canvas to collapse them again.
- Right-click a handle to reset it to its default. The reset can be undone like any other change.
Following a guide’s tangent
Section titled “Following a guide’s tangent”When a stitch is snapped to a guide, it can automatically lean to follow the curve of that guide. This is controlled per stitch in the Inspector’s Guide tangent section:
- Follow guide tangent checked (the default): the stitch’s top angle tracks the guide’s tangent, so a round of stitches fans neatly around a circle or along a curve. While following is on, the cap angle is locked — the Inspector notes Cap angle is locked while following — and the cap-angle handle is hidden in Advanced sizing.
- Follow guide tangent unchecked: the stitch keeps its own angle instead of following the guide, which is useful when you want a stitch to stand straight regardless of the curve it sits on.
Stroke width and line ends
Section titled “Stroke width and line ends”The stroke is the line that stitch symbols are drawn with. You can set its Width (from 0.5× to 3×) and its Line ends (Round, Square, or Flat) at three levels:
- For a stitch or selection — in the Inspector’s Stroke section. Values inherited from the diagram appear muted and are marked Diagram default; Reset to diagram removes a stitch’s own setting.
- For the whole diagram — in the settings menu (the gear) under Stroke.
- For new diagrams — in Settings → Crochet → Stroke. Existing diagrams keep their own setting.
The stroke looks the same at any zoom level, and it also sets the base thickness of annotations.
Default stitch sizes
Section titled “Default stitch sizes”If you always draw stitches a little taller, wider, or at a different angle than the standard shape, set your own defaults under Settings → Crochet → Default sizing. Choose a Stitch type, adjust its lengths, widths, angles, and gaps, and select Apply. Reset this stitch and Reset all return to the original defaults.
Default sizes apply to newly created diagrams only — existing diagrams keep the defaults they were created with, and resetting a handle in the editor returns it to that diagram’s defaults.