Annotations
Annotations are the marks you add on top of a chart to help someone read it: a triangle where the work starts, an arrow showing the direction of a round, a circle around a repeat, or a text note. They live on their own annotation layer, so you can draw them freely without disturbing your stitches.
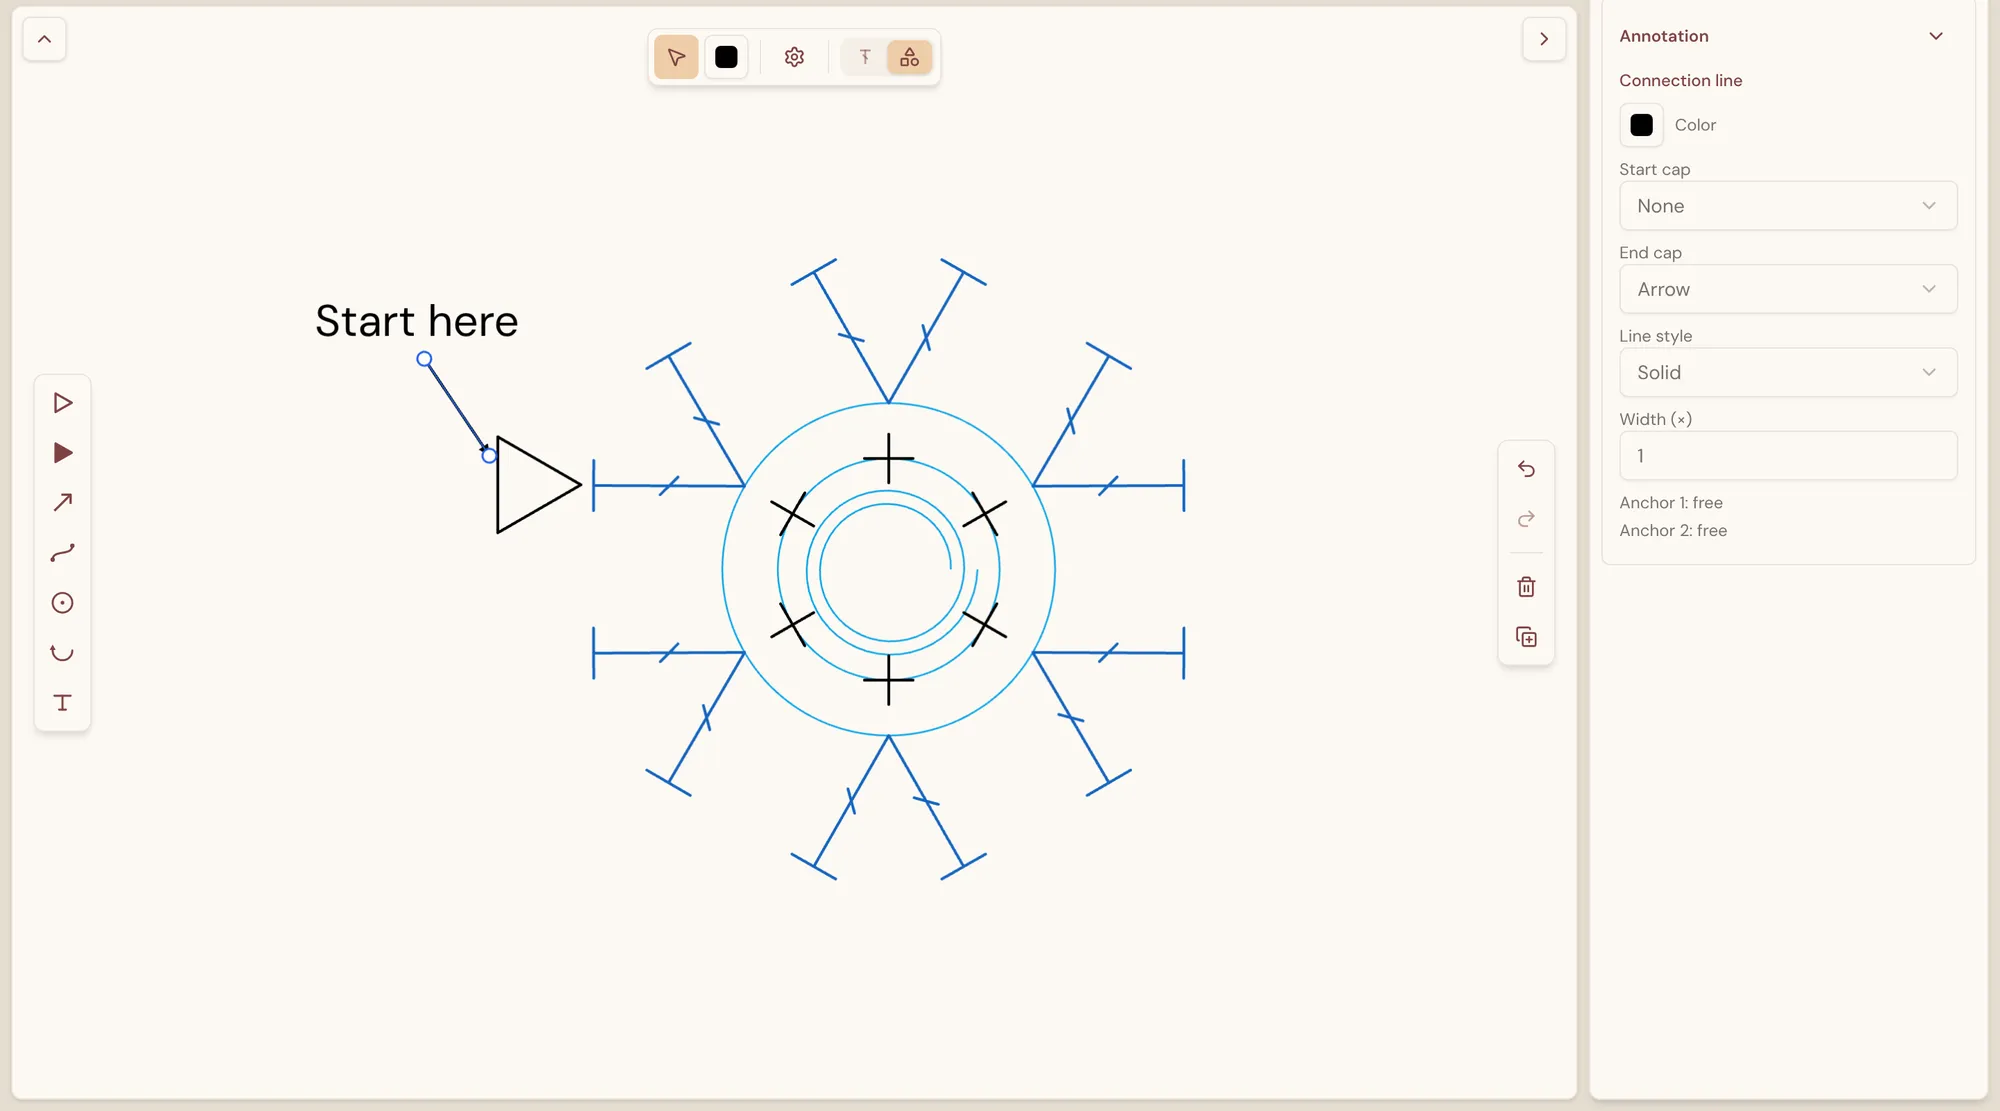
Switching to the annotation layer
Section titled “Switching to the annotation layer”Use the Stitch / Annotation switch at the right end of the toolbar, or press 2. Press 1 to return to the stitch layer.
On the annotation layer:
- Your stitches stay visible but cannot be selected or changed.
- The left rail offers annotation tools, the right edge has an annotation action toolbar, and the properties column shows the Annotation panel.
- The toolbar shows Select and an Annotation color swatch, which sets the color of new annotations.
Annotations are always visible on the stitch layer too — you just cannot select them there. Undo and redo work across both layers: Cmd/Ctrl + Z undoes your most recent change, whichever layer it was on.
Adding annotations
Section titled “Adding annotations”The rail on the left has seven tools:
| Tool | What it adds | How to place it |
|---|---|---|
| Start marker | A hollow triangle marking where the work starts | Click the canvas |
| End marker | A solid triangle marking where the work ends | Click the canvas |
| Line | A straight connection line, with an arrow at the end | Press and drag from one end to the other |
| Curve | A curved connection line | Press and drag from one end to the other |
| Circle | A circle | Click the canvas |
| Arc | Part of a circle, with an arrow at the end | Click the canvas |
| Text | A text label | Click the canvas, then type |
You can also drag any tool straight from the rail onto the canvas. After you place one annotation, the tool is put away and the new annotation is selected, ready to adjust.
The ends of lines and curves snap to nearby stitches. An end attached to a stitch follows it when the stitch moves — handy for an arrow that points at a particular stitch.
For a text label, type your text after you click; press Enter for a new line. Press Esc, click outside the label, or select the Editing text chip at the top of the canvas when you are done. A label left empty is removed.
Selecting and editing
Section titled “Selecting and editing”- Click an annotation to select it, and drag to move it.
- Cmd/Ctrl-click or Shift-click to add more annotations to the selection, or drag a marquee from an empty spot — anything the box touches is selected. Cmd/Ctrl + A selects every annotation.
- Arrow keys nudge the selection (hold Shift for bigger steps).
- With two or more annotations selected, use the corner handles of the box around them to resize them together, and the round handle to rotate them.
Each kind has its own handles:
- Markers — drag a corner handle to resize, an edge handle to stretch in one direction, and the round handle in front of the tip to rotate.
- Text labels — drag a corner handle to change the font size, and the round handle to rotate. Double-click the label (or press Enter) to edit its text.
- Lines — drag an end to move it; drop it on a stitch to attach it. Moving the whole line detaches both ends.
- Curves, circles, and arcs — double-click (or press Enter) to edit the shape. A curve shows its anchor points and handles (press T to change a handle’s type), a circle shows its center and radius, and an arc shows its center, radius, and both ends. Press Esc or select the chip at the top of the canvas when you are done.
The Annotation panel
Section titled “The Annotation panel”Select an annotation to see its settings in the Annotation panel:
- Color — every annotation has its own color.
- Markers — Angle, Width, and Height.
- Lines, curves, circles, and arcs — Start cap and End cap (None, Arrow, Dot, or Bar; not for circles), Line style (Solid, Dashed, or Dotted), and Width. For a line, the panel shows whether each end is attached to a stitch.
- Text labels — the Text itself, Size, Angle, Font (Sans, Serif, or Mono), and Bold, Italic, and Underline.
- Edit shape — for curves, circles, arcs, and text labels, start editing on the canvas.
- Delete — remove the annotation.
Copying, duplicating, and deleting
Section titled “Copying, duplicating, and deleting”| Action | Shortcut |
|---|---|
| Copy the selection | Cmd/Ctrl + C |
| Paste at the pointer | Cmd/Ctrl + V |
| Duplicate the selection | Cmd/Ctrl + D |
| Delete the selection | Delete, Backspace, or X |
| Cancel placing or editing | Esc |
Undo, Redo, Delete, and Duplicate are also in the action toolbar on the right edge of the canvas.
Where annotations appear
Section titled “Where annotations appear”Annotations are part of your diagram. They appear in shared and view-only views, in exported images, in thumbnails, and when you add the diagram to a pattern. Viewers cannot select or change them.