Canvas basics
The crochet editor canvas is where you view and build your diagram, and learning to pan, zoom, and select stitches on it is the foundation for everything else in the editor.
Panning and zooming
Section titled “Panning and zooming”How you move around the canvas depends on your input mode, which you set in the editor’s settings menu (the gear in the toolbar) under Input mode:
- Keyboard + Mouse (the default) — the scroll wheel pans the canvas. You can also pan by holding the Space bar and dragging, or by dragging with the middle mouse button. To zoom, hold Ctrl while you scroll.
- Trackpad — a two-finger swipe pans, and a pinch zooms.
On a touch screen, use two fingers to pan and pinch to zoom. Zooming centers on the pointer, so point at the part of the diagram you want to look at before you zoom in.
The canvas grows as your diagram does, so there is always room to keep working around the edges.
Modes and tools
Section titled “Modes and tools”The four mode buttons at the left of the toolbar set what a click or drag on the canvas does:
- Edit (the arrow) — the default. Select and move stitches and drag their handles.
- Place (the +) — place the currently armed stitch or guide by clicking the canvas.
- Chain — move and rotate the chain-ellipse guide.
- Sizing — adjust the size and shape of stitches (covered in Sizing and shaping stitches).
Below the toolbar, the Stitch / Guide switch chooses whether you are working with stitches or with the guides that stitches snap to. Press A to switch between them. The Guide tool has only the Edit and Place modes.
Stitch and annotation layers
Section titled “Stitch and annotation layers”The two-part switch at the right end of the toolbar chooses the layer you are working on:
- Stitch (press 1) — the stitches and guides that make up your chart.
- Annotation (press 2) — notes, arrows, start and end markers, and other marks drawn on top of the chart. See Annotations.
Selecting stitches and handles
Section titled “Selecting stitches and handles”Each stitch has two handles: a base (the filled circle at the bottom) and a top (the hollow ring at the top). Selecting a stitch highlights it and shows these handles. You can select a whole stitch, or just one of its handles.
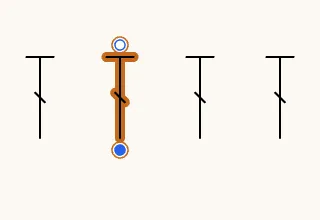
- Select a whole stitch by holding Alt (Option on a Mac) and clicking it, or by dragging a selection box (a marquee) around it from an empty part of the canvas. Everything inside the box is selected.
- Select just a handle by clicking it, or by dragging a marquee around only that end of the stitch — for example, box the top ring to select only the top. This matters when you want to add a stitch on top of another, which needs the top handle in the selection (see Adding stitches).
- Add to a selection by holding Cmd (Ctrl on Windows) while you click or marquee, which toggles items in and out.
- Clear the selection by clicking an empty part of the canvas.
When several handles sit on the same spot — for example, a stitch’s base resting on the top of the stitch below — click again (or Alt-click) to step through them: the lower stitch’s top, then the upper stitch’s base, then both. Hold B while you click to pick only bases, or T to pick only tops.
Alt-clicking a guide selects every handle snapped to that guide, which is a quick way to select a whole round.
Selecting a stitch also fills in the Inspector in the column on the right, where you can read and change its color, stroke, round, order, and links.
Touch screens
Section titled “Touch screens”On a touch screen, a long-press opens the right-click menu, and two toggle buttons appear at the bottom right of the canvas: Add to selection (works like holding Cmd/Ctrl) and Alt actions (works like holding Alt).
Undo, redo, and delete
Section titled “Undo, redo, and delete”Every change you make can be undone. Use the Undo and Redo buttons at the top of the action toolbar on the right edge of the canvas, or the keyboard:
- Undo — Cmd/Ctrl + Z
- Redo — Cmd/Ctrl + Shift + Z (or Cmd/Ctrl + Y)
- Delete the selection — the Delete or Backspace key (or X)
Finding a feature with the command palette
Section titled “Finding a feature with the command palette”Press Cmd/Ctrl + K to open the command palette, then start typing what you want to do — for example flip, paste, or snap. The palette lists matching editor features with their keyboard shortcuts.
- Select a command such as Flip selection horizontally or Toggle snap to grid to run it straight away.
- For actions that need the mouse — such as panning, grabbing, or sliding along a guide — the palette shows a short How to use explanation instead.
The settings menu
Section titled “The settings menu”The Settings gear in the toolbar holds options for the canvas:
- Input mode — Keyboard + Mouse or Trackpad.
- G-key grab — whether pressing G only picks up the selection to move it (Move only, the default), or can also start a marquee or a placement (Any drag). See Moving and arranging stitches.
- Custom cursor — use StitchPress’s own pointer shapes on the canvas instead of your system’s (on by default).
- Font size — the size of the interface text.
- Canvas grid — Off, Dots, or Lines behind your diagram, plus a Ruler along the top and left edges, and Snap to grid (Q), which snaps stitches to the grid while it is showing.
- Canvas background — Paper, White, Linen, Stone, Charcoal, Night, or a Custom color. This is saved on your device and never appears in exported images.
- Overlays — show or hide Round numbers, Stitch order, and Guides on the canvas.
- Stroke — the line width and line ends for every stitch in this diagram (see Sizing and shaping stitches).
- Stitches used — a legend of every stitch type in the diagram.
- Generate text — written, round-by-round instructions for the diagram, with a Copy button.
- Info — the app version.
Keyboard shortcuts
Section titled “Keyboard shortcuts”The full, up-to-date list of shortcuts lives in Settings → Hotkeys. The ones you will reach for most in the crochet editor are:
| Action | Shortcut |
|---|---|
| Save | Cmd/Ctrl + S |
| Open the command palette | Cmd/Ctrl + K |
| Pan the canvas | Space + drag / Scroll |
| Zoom | Ctrl + scroll |
| Undo / Redo | Cmd/Ctrl + Z / Cmd/Ctrl + Shift + Z |
| Copy / Paste at pointer | Cmd/Ctrl + C / Cmd/Ctrl + V |
| Repeat the last action on the selection | Cmd/Ctrl + D |
| Delete selection | Delete, Backspace, or X |
| Move selection (grab) | G |
| Lock a grab to the X / Y axis | X / Y (while grabbing) |
| Slide the selection along its guide | C |
| Nudge the selection | Arrow keys (Shift for bigger steps) |
| Lengthen / shorten the selection | ] / [ |
| Fill the guide with the selected stitches | F |
| Align to the guide normal / radially | R / Shift + R |
| Flip horizontally / vertically | N / M |
| Switch stitch / guide tools | A |
| Switch to the stitch / annotation layer | 1 / 2 |
| Open the stitch pie menu | Hold S |
| Toggle stitch linking | L |
| Toggle snap to grid | Q |
| Show / hide the properties column | Cmd/Ctrl + \ |
| Confirm a pending action | Enter |
| Cancel the current action | Esc |