Adding stitches
You can add stitches to your diagram from the stitch rail, the stitch library, or the pie menu, building up rounds and rows one stitch at a time. This page covers placing basic stitches, adding a stitch on top of (or under) another, building increases and decreases, and placing whole runs of stitches at once.
Dragging a stitch from the rail
Section titled “Dragging a stitch from the rail”The stitch rail down the left edge is where stitches come from. Make sure the Stitch side of the Stitch / Guide switch is selected.
- Press on a stitch icon in the rail — for example Double crochet — and drag it onto the canvas.
- Release where you want the stitch. The stitch appears as its standard crochet symbol.
Clicking a rail icon instead arms that stitch without placing anything. Switch to Place mode in the toolbar, then click the canvas to place the armed stitch.
The rail starts out with Double crochet, Chain, Single crochet, and Slip stitch. For everything else, select All stitches to open the full library. It has a search box (you can search by name or by abbreviation, such as dc or fp) and category tabs — All, Basic, Posts, and Clusters. Drag a stitch straight out of the library, or select its pin (Pin to rail) to keep it on the rail so it is always one drag away.
The library includes the standard height stitches (single, half double, double, treble, and double treble crochet), chains, slip stitches, front- and back-post stitches, reverse (crab) and twisted single crochet, and cluster stitches, along with several variants of the single crochet symbol.
The pie menu
Section titled “The pie menu”Hold S with the pointer over the canvas to open a ring of common stitches around the pointer. Move toward a stitch and release to choose it. Slices ending in … — such as Single crochet…, Front post…, Back post…, or Increase / decrease… — open a second ring with more choices.
In Edit mode the chosen stitch is placed right where you opened the menu; in other modes it is armed, ready to place.
Adding a stitch on top of another
Section titled “Adding a stitch on top of another”Real crochet is worked into the stitches below, and the editor mirrors that: you can add a new stitch directly on top of an existing one, which links the two together.
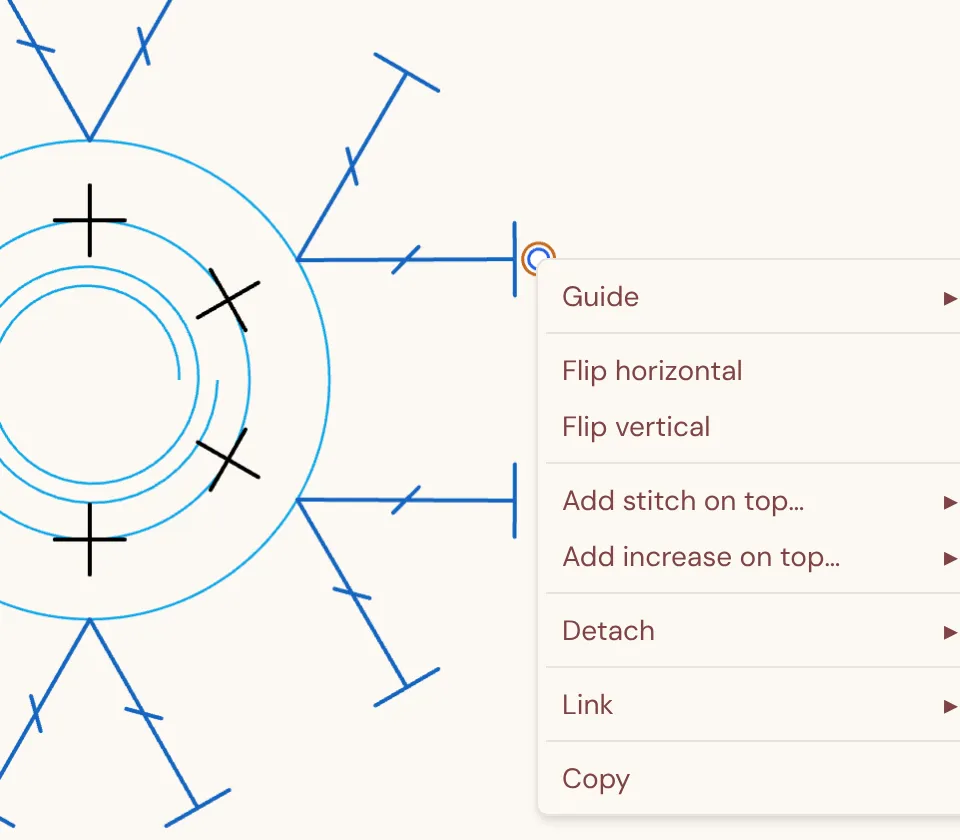
- Select the stitch you want to build on, making sure its top handle is part of the selection — click the top ring, Alt-click the stitch, or marquee around it.
- Right-click (or long-press on a touch screen) the stitch to open its menu.
- Choose Add stitch on top… to add a single stitch and pick the stitch type, or Add increase on top… to add an increase and pick how many tops it has (2 tops to 5 tops).
If the Add … on top items are missing, the top handle is not in your selection — reselect and include the top ring.
Working into both sides of a foundation chain
Section titled “Working into both sides of a foundation chain”When you work back along the other side of a foundation chain — for an oval, for example — select the tops of the chains, right-click, and choose Add stitch under… or Add increase under…. The new stitches attach to the underside of the chain and point away from it. You can also drag a stitch’s base onto a chain’s underside; faint markers show where it can attach.
Increases and decreases
Section titled “Increases and decreases”An increase works two (or more) stitches out of one base; a decrease joins two (or more) stitches into one top. Both are built with a short click sequence rather than a single drag.

- Select Increase — single crochet or Decrease — single crochet on the rail. (Use All increases & decreases to choose a different stitch — half double, double, treble, double treble, or front- and back-post stitches — and pin it to the rail.) The editor switches to Place mode.
- Click the canvas to set the shared end: for an increase, the first click places the shared base; for a decrease, it places the shared top.
- Click again for each stitch that fans out from it — two clicks for a standard 2-into-1 increase or 1-into-2 decrease.
- Press Enter (or right-click, or double-tap) to finish. Press Esc at any point to cancel.
Chains and spaces
Section titled “Chains and spaces”A chain is just another stitch on the rail — drag it out like any other, and place several in a row to make a chain of the length you need. There is also a Chain mode in the toolbar for moving and rotating a chain guide.
Right-click selected chains for chain-specific commands:
- Assign as space turns the chains into a chain space (for example a ch-3 space) that later stitches can be worked into. See Chain spaces.
- Mark as turning chain marks a chain as the turning chain at the start of a row.
Placing many stitches at once
Section titled “Placing many stitches at once”To place a whole run of evenly spaced stitches in one step — a full round or a long row — put down a guide or ring first, then right-click it and choose Add stitches…. You can add a single stitch type or a repeating sequence such as sc, (ch, ch, sc) * 3. See Adding stitches along a guide.
Diagrams made with the older stitch arrays still open: each array is turned into ordinary stitches in the same places, which you can then edit one by one.